How to Build a Computer Vision Project Easily and without Code
A beginner friendly, no-code solution to your own fruit detector. Also, upload the model to the Internet for everyone to see!

Do you want to build an app to detect something? Cats vs. dogs, detect how ripe a fruit is, find brands in images?
Do you want to just label a few images, make a model and test it without much work?
If you answered yes, then this article is for you!
I will show you how to build an app for your detector and put it in the Internet for everyone to see.
In the end, you will have something like this to show your colleagues and friends: 🤗 https://huggingface.co/spaces/Kili/plastic_in_river
You will be able to upload a test image, and the model will return the boxes and the labels. Amazing! ⚡️
Disclaimer: you will need to have git installed in your computer to upload the files to HuggingFace Spaces. If you don’t have it, don’t worry! It’s very easy to install. Follow this: https://git-scm.com/downloads
This will be the workflow of the project:
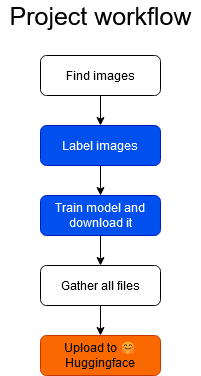
Workflow of the project
- First you will have to gather the images for your project. Do you want to detect zebras from giraffes? Get images of both animals. Whatever you want to detect, you need images from that. This point is white in the workflow, meaning you will have to do the work in your computer.
- Label images appears blue in the workflow, that is because you will use Datature’s labeling tool. Datature is a company that specializes in building user-friendly tools for data labeling and model training.
- You will also use Datature’s tools to train a model, in a no-code and really easy way.
- Once the model is trained, you will download it to your computer and put all the files together (These files I will provide to you)
- When all files are put together, you will upload them to 🤗 HuggingFace Spaces and your model will be ready to use! 🚀
1. Find images
First thing we need to do in a computer vision project is to collect images. If we wanted to train a deep neural network, we would need thousands of images.
Fortunately, Datature uses very advanced models and possibly pre-trained, which means we only need a fraction of the images that we would need if we had to train a model from scratch.
It should be enough to have around 100 images per class. For example, if you want to detect t-shirts and pants, you will need 100 images of t-shirts and 100 of pants. This example applies to other cases as well, of course. For instance you can have 100 images where there are cats and dogs, so you get 100 examples of cats and also 100 examples of dogs.
It’s ok if there is class imbalance, for example if your project is detecting sunny vs. cloudy, you can have 120 images of sunny and 100 of cloudy. But it is important that the model has a minimum amount of images, and around 100 should be enough.
Collect all images and store them in a folder in your computer.
2. Label images
Make an account in Datature and create a project for your usecase. This tutorial from Datature’s team explains how to create a project and label images.
https://datature.io/blog/train-and-visualize-face-mask-detection-model
This blog post details how to:
- Create Datature Nexus account (free trial)
- Create a project
- Upload images
- Create classes
- Annotate images
- Create rectangular boxes in images
- Assign a class to each box
For each image, you will annotate a box (where is the object?) and a class (what is this object?).
Read only the labeling part and after that, in the Project Overview you should see your image statistics, tag distribution etc. For example, the Project Overview should look like this:
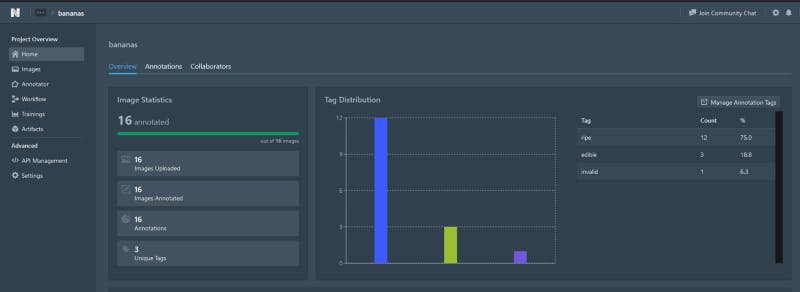
Example of project overview after labeling
In this example, I have a project called bananas, I labeled 16 images and I have 3 classes: ripe, edible and invalid. This is just an example, so make sure you have at least 100 examples for each class!
3. Train model
Once we have our images, we can train our model! We will have to create a ‘Workflow’ in Nexus. Try to use the documentation and the blog post from be previous section: https://datature.io/blog/train-and-visualize-face-mask-detection-model to do the following steps:
- Build training workflow: select train-test split ratio, select augmentation and select model settings
- Train model
- Monitor model: loss, precision & recall
- Export model
The model will take around 1h to train, and after that you should see this

Finished training example
Go to Artifacts and download the TensorFlow model
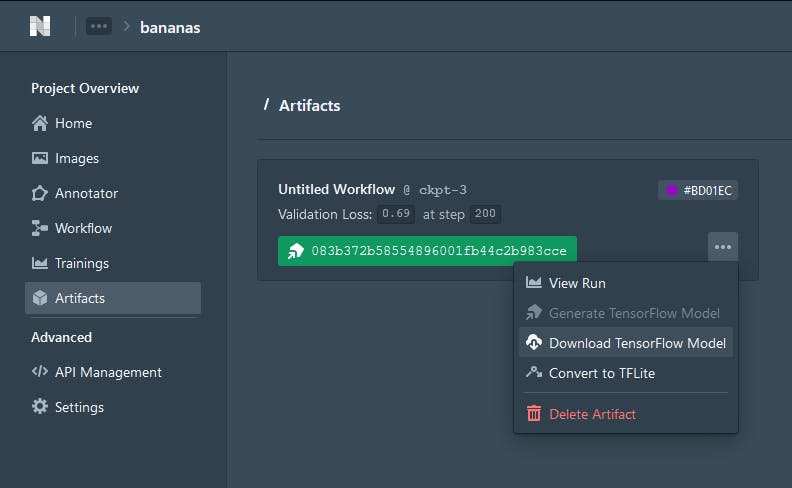
Artifact download example
This section is finished when there is a .zip exported in the computer with the trained model parameters.
4. Create a 🤗 HuggingFace account
The model is trained, we have downloaded it as a .zip to our computer. But how do we interact with it?
We can interact with it by uploading to Huggingface Spaces. We also need some code for the frontend of the website, and that code you can find it here in this tutorial.
Huggingface Spaces is a website from Huggingface where people can showcase their models and interact with them. Sort the spaces by ‘Most liked’ and explore some of the spaces :)
These are the steps
- Create Huggingface account
- Create a Space
- Write a name for the space. Remember, this website will be public, so choose a name that matches what the app does! For example: banana-analysis or something like that
- Select Streamlit as the Space SDK
- Choose Public
- When the space is done, clone the repository to a folder in your local computer
- Optionally, open README.md using a text editor and change the emoji for the project
5. Gather all files and upload to 🤗 HuggingFace Spaces
Now we have the folder belonging to the 🤗 Space in our computer. We have to copy all our files there and upload everything to the 🤗 Space using git.
First, copy the model files (saved_model/ folder, label_map.pbtxt file) into this folder
Then, create the 3 files in this Gist in the folder: https://gist.github.com/anebz/2f62caeab1f24aabb9f5d1a60a4c2d25
app.py
This file contains the code to upload image, load model, do preprocessing, and get predictions from the model.
Pay attention to the lines with #TODO, you will have to change these!
Especially the color_map in lines 112–115, these are the colors of the boxes for each class. Open the file label_map.pbtxt to see what label_id has been assigned to each class, and use this label_id to assign the RGB values for the color. In this example I only have 2 classes and therefore only 2 colors. If you have more classes, add more lines following the format of the example:
1: [255, 0, 0],
Remember that each line should have a comma in the end except the last line!
packages.txt and requirements.txt are the libraries that will be installed in the 🤗 Space. These files are very important, without them the code will not be able to run.
In the end, the folder should look like this

Folder overview
- saved_model/ is the folder that was in the .zip you downloaded from Datature earlier
- label_map.pbtxt was in the .zip you downloaded from Datature earlier
- .gitattributes was in the folder already when you git clone-d the repository from the 🤗 Space
- README.md was in the folder already when you git clone-d the repository from the 🤗 Space
- app.py is the file you created with the code I wrote earlier in the article
- requirements.txt is the file you created with the lines I wrote earlier in the article
- packages.txt is the file you created with the lines I wrote earlier in the article
Once all the files we need are in the folder, we can push this to the 🤗 Space. Open the Git Bash and paste these commands one by one:
- git add .
- git commit -m “Added files”
- git push
The app will take some time to upload the files, especially the model files. After the git push is complete, the 🤗 Space will take some minutes to build the application and show our App in the 🤗 Space.
In case git shows an error about the model file being too big, check out these posts: https://discuss.huggingface.co/t/uploading-large-files-5gb-to-hf-spaces/12001/4 and https://discuss.huggingface.co/t/uploading-files-larger-than-5gb-to-model-hub/4081/6
In the end, your app will appear similar to this: https://huggingface.co/spaces/anebz/test
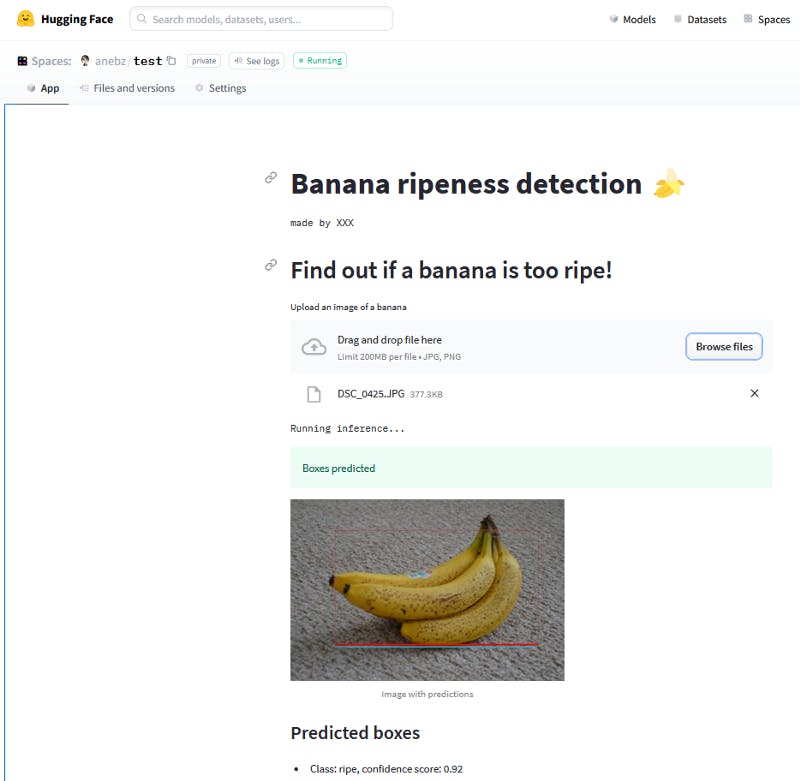
You can upload an image, the model will take some seconds to load, and then you will see the predictions. Project complete! 🏋️
Conclusion
Your project is finished, congratulations!! You were able to quickly create an App from scratch, using only a few hundreds of images. You only had to install Git in your computer and didn’t need Python or didn’t have to code anything.
⚠️‼️ If you try to do this project and encounter errors or difficulties, don’t hesitate to contact me! I will be more than happy to help you.
- Twitter: https://twitter.com/anebzt
- Github: https://github.com/anebz/
Thank you for reading!